
Mini Specialisation: The Pickles Project
- Savannah Edwards

- Dec 9, 2018
- 9 min read
Updated: Dec 21, 2018
A facial expression is like an indication of what intent the action of a character is. A character could be jumping up and down, with a frustrated face we see it as anger, with an excited face we see he very same action as joy. For my mini specialisation I chose to focus on faces, mainly for the fact showing various facial expressions on my characters and in my drawings is something I struggle with. In so many of my drawings my characters all have the same expression. Moreover, I haven't really explored too much 2D work and I'm keen to try it after learning so much in 3D and see if some of that skill from 3D transfers to my 2D. For this project I have chosen to explore a completely new workflow and something very different to what we've been exploring this year. Working in After Effects I have produced a facial rig as well as a mouth and full body rig (more-so as an add on) with the help of some plugins: Duik Bassel, Joysticks 'n Sliders and Rubber Hose 2.
What follows is the body of work I have produced, the research I have conducted, as well as the breakdown of the process I went about to make the facial rig for my character Pickles.
Body of Work
See: https://www.artstation.com/artwork/BmX2B6
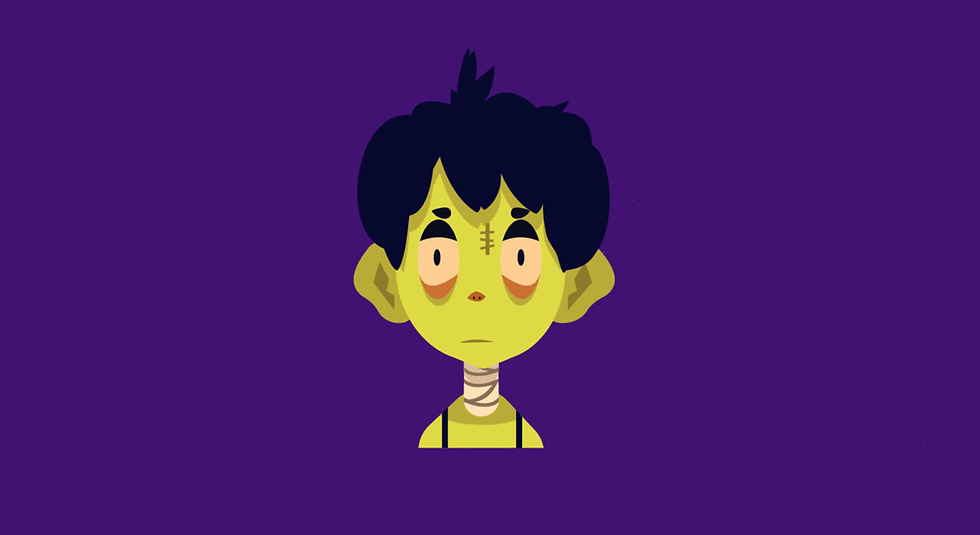
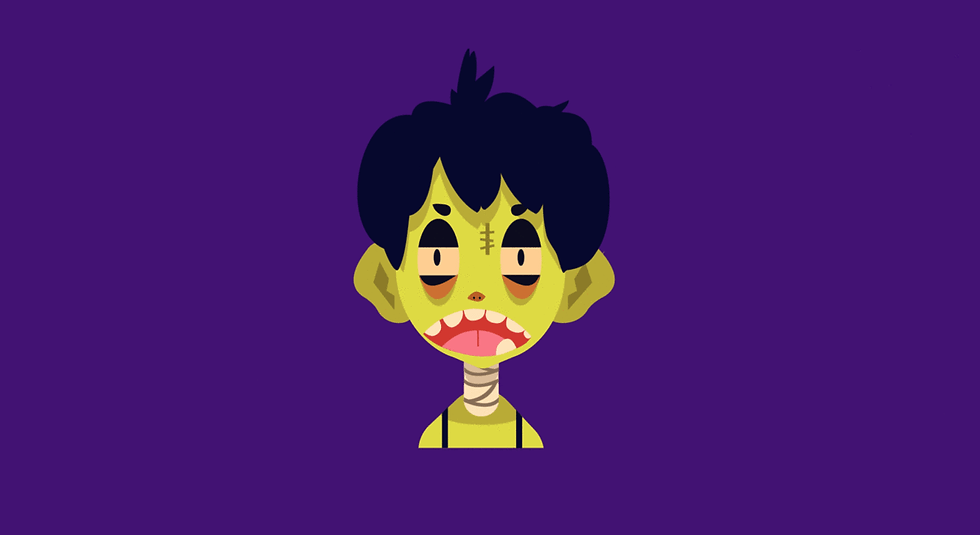
Facial Expression Studies


Designing Pickles


Pickles Rig Assets


Pickles Rigs
Demo of the full body rig with the heavy lift exercise from the Animation Body Mechanics project.


Workflow Breakdown
To get the point where I had gotten to there were a number of stages and phases I had to get through before getting to a level I was satisfied with for this project.

1. Research & Brainstorming: Once the project had been announced as kicked off I had put a lot of thought into what I wanted to do. I did a lot to think about what kind of animation I wanted to produce. I thought about what aspects of my animation and art I wanted to explore and build upon Before deciding on After Effects I tried using Maya and Toon Boom . This ended up taking a while and bit time out of working time. Once I had figured out the kind of project I wanted to do I delved into researching and practicing drawing facial expressions to better understand and grasp facial anatomy. Throughout the whole project I came back to this stage when I wasn't sure how to do something and watched a number of tutorials and read articles.
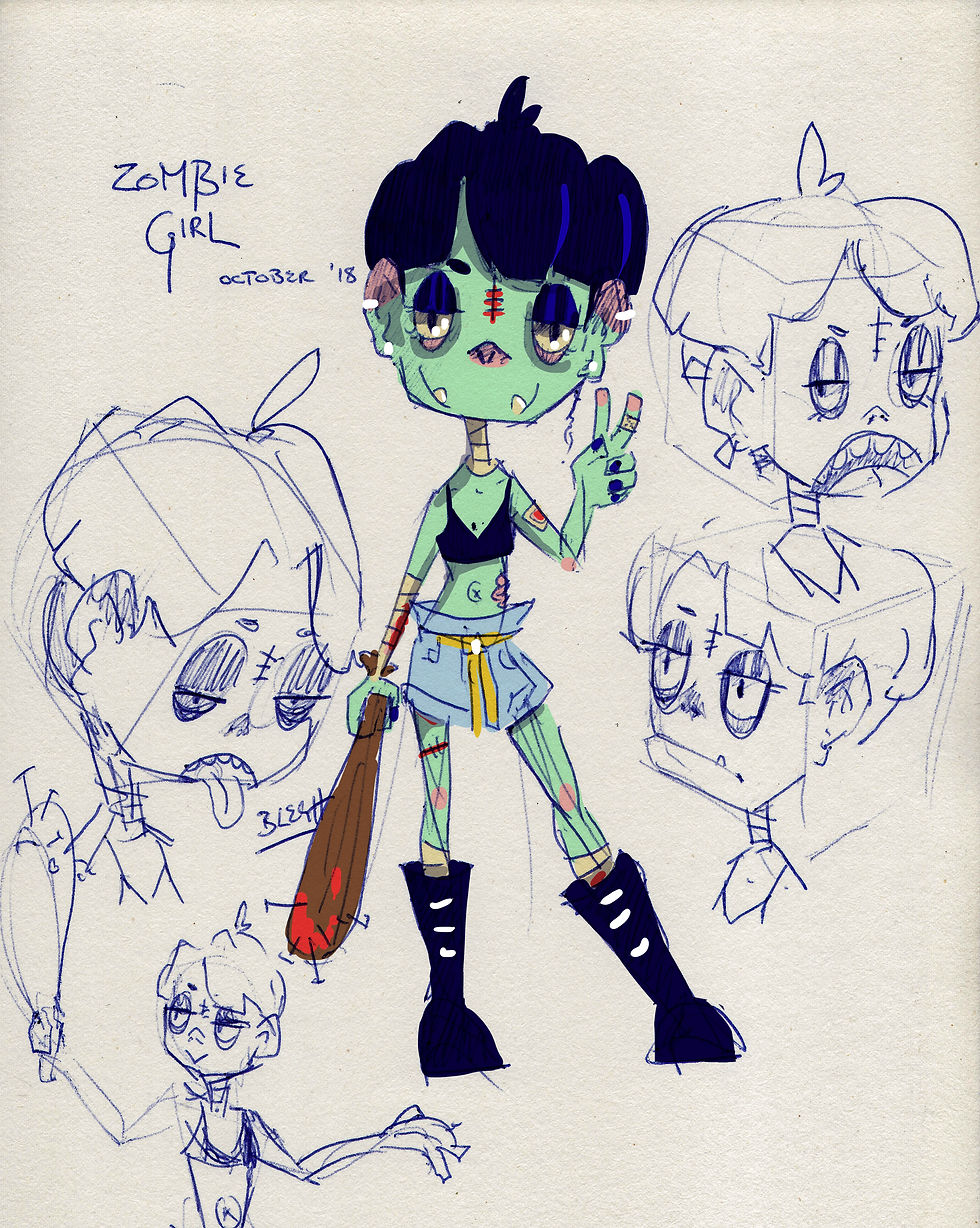
2. Planning and Designing: As I was making a facial rig I wanted to design a character who's face could be expressive and was appealing overall in design and style. I had that in mind when I was designing Pickles. I did a few iterations of her design before deciding on the final design for her face and body.

3. Making the Final Assets: Once the final designs had been decided upon I went to work in Adobe Illustrator to make the assets needed for both a face rig and a body rig in After Effects. I had initially wanted to make them in Photoshop but was cautioned about quality and how Illustrator's vectors are safer to work with over Photoshop's bitmaps after some more research. For the rigs I separated all the assets into individual layers for the convenience of when I started rigging and testing so that i could go back to the Illustrator file when I needed to change something about the rig or combine different pieces.
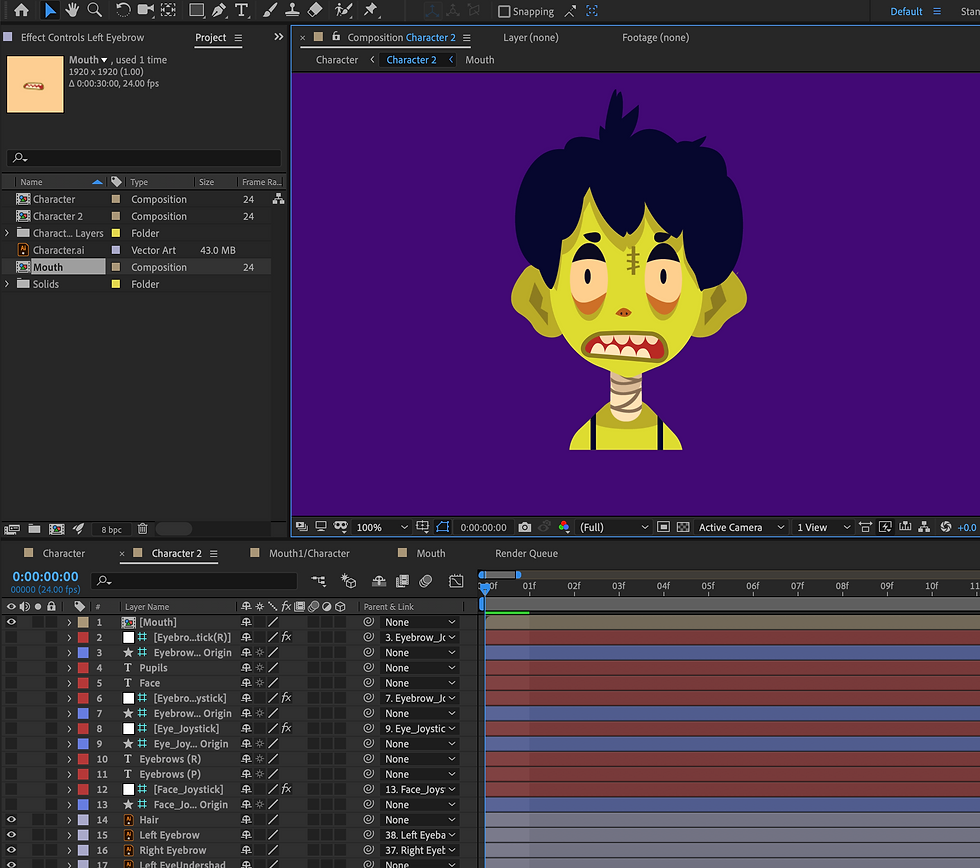
4. Prepping: After importing the illustrator files into a new After Effects project I needed to convert the files into compositions, seperate the layers then organise the groups of layers in preparation for rigging and animating. I had a bit of trouble here as I was looking at various tutorials and wasn't sure if I further wanted to convert the Illustrator layers into shape layers or leave them as is. I ended up leaving them as Illustrator files so that I wouldn't have to reimport the files if any changes needed to be made to the rigs.

5. Rigging & Testing: To make the facial rig I used Joysticks 'n Sliders . I made 5 keyframes of the face and its features in a neutral, left, right, up and down pose. After making these keyframes I went into the plugin and made a joystick with all these keyframes. Testing it wasn't too hard as most parts came out good the first time round. The body rig on the other hand was certainly more tough to rig. I had to go through multiple versions of the rig - editing it in Illustrator- before I could get something I could work well with. I did a lot of parenting and pairing and making sure the pivot points were correctly positioned. In early stages I used some of the plugins to rig the limbs but they did not work as well as I had hoped and so I ended up leaving the small things like pupils and Pickles' hair tuft to those plugins. The rig now still protrudes in places but much less than before.

5. Animation: When the rigs where finally done to a point where I could start animating with them I could animate as I have done across most programs as it was pretty universal with curve graphs, key-framing, etc. The only really big problems I had when animating was operating the body rig as it was really my first 2D rig so it was lacking and a bit hard to operate. The facial rig was super easy to use due to the plugins.
Research, Tutorials, References and MoreI ended up investing a lot more time in this project than I had initially thought to. I was really keen on learning how work in After Effects as well as how to utilise the different tools like using expressions, various plugins and scripts. I invested a lot of time into learning as much as I could about character animation in After Effects. I shared almost all of my research for this project with my Animation Body Mechanics project as I also was animating in After Effects for that.
aescripts + aeplugins. (2016). Joystick 'n Sliders Tutorial [Video]. Retrieved from https://www.youtube.com/watch?v=8OoEypt1YXU
The first tutorial I had a look at regarding Joysticks 'n Sliders, it was really helpful giving the low down on the basic functions of the tool.
backwoods animation. (2018). After Effects Tutorial - Mouth Rig | Joysticks n Sliders | Easy to animate mouth for lip sync [Video]. Retrieved from https://www.youtube.com/watch?v=XX2SkLMtgR0
Really awesome tutorial to follow, I followed it for my mouth rig on Pickles' face and though my execution isn't perfect I'm still pleased with how it turned out for my first go at it. Jared Freitag (backwoods animation) produces some really awesome stuff and was happy to see that he released this tutorial. The mouth rig he makes here is quite ideal for lip syncing.
Colombo, E. (2017). After Effects character animation workflow [Video]. Retrieved from https://www.youtube.com/watch?v=--oTQCysVTs
A really great look at the character pipeline in After Effects from the design to the polished animation. I learned a number of new tools and techniques observing this video.
Dufresne, N. (2018). About - Duduf After Effects Framework. Retrieved from https://rainbox-dev.github.io/DuAEF_Duik/
The Duik Bassel wiki that contained all the information I needed about the script. It was really helpful when I was stuck on how to do something, especially using constraints with Duik Bassel (which is actually a really awesome and straight forward feature).
Easy After Effects. (2018). Apple animation tutorial - Bouncing balls / Intention part 8 [Video]. Retrieved from https://www.youtube.com/watch?v=2DTL0WXr80M
I followed this tutorial when I was first starting the exercises and it was very very helpful and easy to follow. I also discovered a number of other easy and good practice tutorials from this channel that I'll probably give a whack over the holidays.
Fiz. (2017). Skip Animation Tutorial (Felix Sputnik) [Video]. Retrieved from https://www.youtube.com/watch?v=l3AlUyOjNb8
This was a fantastic tutorial and explanation about animating a skip cycle, Felix talks about the way in which the body works and the curves of the spine, even providing a side by side shot of his animation and a super easy to read timeline for each part of the body, showing the curves. I utilised this for the short action sequence exercise.
Gigantic. (2017). Character Rigging, EASY Character Animation Tutorial In After Effects, Illustrator And Duik Plugin [Video]. Retrieved from https://www.youtube.com/watch?v=IJgAUkjsomA
The first video I watched about rigging the body with AFter Effects and it was a great help when I was first grasping the different scripts and such.
Gigantic. (2017). HEAD ANIMATION Tutorial - Face Rigging in After Effects [Video]. Retrieved from https://www.youtube.com/watch?v=VIRPxf_j21s
A straight forward and easy tutorial on how to turn the head with Joysticks 'n Sliders that I followed to make my own. I also had a look at another face rigging tutorial that was similar but found this to be the easiest and most understandable of the two despite both being pretty simple.
Gilleard, J. (2018). JAMES GILLEARD. Retrieved from http://www.jamesgilleard.com/
James Gilliard was an awesome reference to look at for his Illustrator work. For one project he and Steve Kirby worked on an animated music video and the way his illustrations stood out with the animation really got me to start using After Effects.
Gunn, G. (2018). Lucy - A Free Adobe After Effects Rig. Retrieved from https://www.ggunn.com/resources/free-after-effects-rig-lucy/
I didn't find many pre-rigged characters online to my liking, mainly due to the rigid design of them. When I found this Lucy rig from Greg Gunn I was overjoyed to have found such a cute and awesomely designed character to use for my exercises. I also scrolled through his work and he's really got some beautifully made stuff, one of my favourites being his work on Nat Geo Wild.
Kirby, S. Steve Kirby. Retrieved from https://stevekirby.co.uk/
I really wanted to animate in After Effects after stumbling across Steve Kirby's page, full of some awesome work I got really excited about the technique he was using as it produced some very unique work. That's also how I began using Joysticks 'n Sliders.
Koelsch, C. (2017). TnT Tuts - #4 - Bouncing Balls [Video]. Retrieved from https://www.youtube.com/watch?v=yvZR0Pc3e9o&list=PLHz_Qug46gdXsT7QBGRGTwyBSk7Z5s7QW&index=8
Another tutorial I had a look at for the first exercise and it's very very comprehensive. He covers how various kinds/weights of balls would look animated and so forth. It was great for easing me into After Effects.
Motion Plus. (2017). Motion+ - 01: Simple Head Rig by using Joystick 'n Sliders Tutorial - After Effects [Video]. Retrieved from https://www.youtube.com/watch?v=WqMKMnTYrdY
I watched this when I first started mucking about with face rigs with Joysticks 'n Sliders, it was a really great intro on what to expect when using the plugin in After Effects.
Plaskow, R. (2017). Rigging With Rubberhose | How To Animate [Video]. Retrieved from https://www.youtube.com/watch?v=506_DILyTnE
Probably one of my more favourite tutorials when I was rigging Pickles. It was a fantastic and super helpful tutorial. I skipped to the second half as the first part is creating the character (I already had made Pickles in Illustrator at this point).
School of Motion. (2018). Retrieved from https://www.schoolofmotion.com/
Though a lot of the tutorials and info on School of Motion is paid for, some of the free tutorials were really great resources to read through and watch, especially for motion graphics and the like. I'll probably have another look at some stuff on here in future for browsing.
Tutorials | EasyAfterEffects.net. (2018). Retrieved from http://easyaftereffects.net/category/tutorials/
A really really awesome tutorial mania for After Effects, I discovered it after watching the first bouncing ball tutorial listed earlier. There's a lot of really great tutorials that you can practice and learn with that are super simple and easy to understand.
ukramedia. (2015). 20 Free After Effects Scripts - Part 1 of 2 [Video]. Retrieved from https://www.youtube.com/watch?v=DFHtmmuEpHA&list=PL1gEYuY5m72ZaHv8wYyYrm-vtExK4eeFh
ukramedia. (2018). 22 Free After Effects Scripts - Part 2 of 2 [Video]. Retrieved from https://www.youtube.com/watch?v=duZQQ46p8B8&index=2&list=PL1gEYuY5m72ZaHv8wYyYrm-vtExK4eeFh
As I got more interested in all of the extra plugins and scripts for After Effects, these two videos were handy in discovering new tools.
Williams, M. Morgan Williams - Animation Projects. Retrieved from https://clubcocoanut.com/projects
I really loved her rigging work which was featured on the Duik Bassel download page and was adamant about finding out who did it. I found her eventually and turns out she teaches a very intense course about rigging on School of Motion. She's got some awesome awesome work.
Yes I'm a Designer. (2017). Learn to Draw Anything with Adobe Illustrator CC [Video]. Retrieved from https://www.youtube.com/watch?v=RbbQl2sU-ag
I was a bit clueless with using Illustrator, this was a really good low down on how to do things and make various tools. I had to use it to create my assets as vectors were a lot safer to use in After Effects.
Appraisal
Doing this project was certainly the opening of a new door for me. I had fun learning something new and I've really started to take a liking to using After Effects and plan to keep on learning new techniques and skills as it is a diverse program with so much to offer. Of course there were times were things didn't work as I'd hoped they would have but that can be attested to the fact that this was something new and it was my first shot, so I should be proud of the work I have produced seeing that I hadn't really touched After Effects before this.
When I first started the project I wasn't really sure what to expect, I had initially thought of drawing things frame by frame and was not anticipating that I'd end up making 2D rigs. I think the next time I approach a project like this I need to break my work down into much smaller pieces so I wouldn't get stuck, as well as this just keep other work I have in mind so I can keep everything going and not fall behind, it was a challenge using a new program whilst trying to keep up with what I needed to do. Overall I want to keep on using AFter Effects, I really want to focus a bit more on the rigging and make a really awesome body rig to animate with.
Cheers,
Grassland


Comments